Wednesday, January 26, 2011

A Snow Day Project

Snow Days were made to finish up a craft project! Now, don't get me wrong I still enjoy spending time with the kiddo's on Snow Days. But, while they are taking a nap, I take advantage and use my time to get product done for the booths. And I am not quite done with this project. There is still the Sealing, waiting patiently while it dries, and Finishing up the bottom half. I am thinking about what memories I would put in it and all the idea's to use it for. Such as organizing my messy office space! This one though will be for another person's memories and such. As it will be posted over in the new store as soon as it is done.
Photobucket
I have 2 of these memory boxes to get completed and then I will invest in some more for the store's and the spring show. They are pretty good size. As I haven't measured them yet, because the paint is drying on the lid.
Photobucket
But, it is wonderful to relax and create a wonderful craft on such a Beautiful Snow Day.

Thursday, January 20, 2011

Product Sneak Peek - Keepsake Boxes

I thought I would give everyone a little sneak peek at the new keepsake boxes. These Boxes will replace the paper boxes for the Card Sets and also can double as keepsake boxes. This particular box is for a Baby Boy!
This is the top view:
Photobucket
The Inside View:
Photobucket
and the side view:
Photobucket
The boxes are 1 1/2 inches deep with a 6 inch square on the inside. The actual box itself is 7 x 3 inches. This Box will be posted up tomorrow as it still needs a few more coats of sealer for protection on the inside. Boxes with Cards will be priced at $15.00.
And speaking of new things. I have opened a second store over at the By These Hands site.
http://inspiredcreations.bythesehands.com/
This store will have the same type of items that the Bonanza Store does.

Saturday, January 8, 2011

An Inspiration In The Making Part 2

Well, after a hard day's work the Decoupaged Children's Stool is finally done.
Posted up in the booth for $20.00! Again the photo's do not do it justice!
(Top View)
Photobucket
(Side View)
Photobucket
(Middle View)
Photobucket
I love the color of the paint! I can't wait to get the rest of the projects done and posted!

Friday, January 7, 2011

An Inspiration In The Making

As I write this blog, I have put one coat of sealant on the stool and am waiting for it to dry. When I bought this stool, it was unfinished. And after gathering all the supplies that I would need to complete it, I first sanded the rough spots.
Photobucket
Unfortunately, my camera does not do the colors in the photo Justice. I painted the stool in a lilac dust purple to match the purple in the pink flowers. I then took some light blue paper with different color polka dots in it and decoupage the top the stool.
Photobucket
After I got all the paper on. I used my Sizzix machine and cut out the flowers in matching paper and pasted to the top. The stool also has one flower on each side of the legs. Which will be shown in later photo's. Photobucket
The stool has a bar in the middle between the legs, so I decoupaged each side of that with all 3 papers used in the top. My daughter has already asked if I would do her a Tinker Bell one. I told her maybe for her Birthday. I cannot wait to get this done and get more photo's up!

Wednesday, January 5, 2011

The Fun Of Decoupaging

I am having so much fun Decoupaging the glass vases and the wood. These projects started with a little wood plaque that said Love, Pray, Hope on it. And is growing by leaps and bounds everyday. I did my research on the art of Decoupage after John thought it would be a good idea to seal the first plaque. Then I found I had totally glued the paper on with the wrong glue, that's why it wasn't working right.
So, I used the internet to my advantage on this one and researched the word Decoupage for a couple of days. I searched images and articles to learn about this fascinating way to cover things in paper, glue, and sealer. Of course the article explaining what Decoupage is uses this as a definition: Decoupage is the art of decorating an object by gluing colored paper cutouts onto it in combination with special paint effects.
Me paint? Ha! My husband paints much better than me, specially on small items. So, I decided on the glass vases to cover them all in wonderful paper and then seal them.
Photobucket
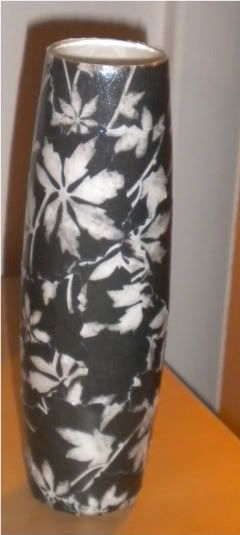
As you can see, from the vase above (Newly Listed in the booth). I put 5 layers of Mod Podge Glossy on these vases to give a shiny effect. Everyone has their own technique when comes to creating things.
Photobucket
If you've never done Decoupage before and are wondering how to get the paper stuck on the project you are working on. I used Elmer's glue and water. Some of the articles said to use half and half, but I found it to be to watery. So, I would use less water then glue. Should be runny though. And sponge brushes are great to get the glue on the back of the paper. Press on your object and make sure there are no air bubbles. If the glue comes out the side of the paper, that's okay too! Let dry and seal. Some sealers though recommend you sand them after. So, I would use a thin layer on all the layers until you get it built up to where you feel comfortable.
I also used those wonderful Decorative Scissors for Scrapbooking to cut out the paper. If your a starter on this, I would use thin paper versus thick decorative scrapbook paper. On the Black and Cream vase the paper was thick and I had a lot of trouble getting it to stay on the glass versus the White/Blue vase where I used thin paper.

Tuesday, January 4, 2011

A little peek at the wood plaques

I thought you'd like to see a little peek at the wood plaques. They all won't look like this, as this is really my first time making these. But, as I got started in doing them, John said they really look like coasters. So, after I get done with the plaques, I will make a set of them as coasters as well.
Photobucket
I have another one to match this one. But, I haven't started it yet. Hopefully today, I will have them done. I am still waiting on the clips to come in for the Bows.
This has been quite a challenge for the whole family, as I have taken over the dining room table to add the new inventory in and get it finished. My office is in the process of being cleaned and organized and then I will have to find an extra spot for the new things and a place to work on them. Maybe one day I'll be completely organized!